miércoles, 21 de diciembre de 2011

Pecan Pie Bars


I like pecan bars that are gooey and caramelly, just like my pecan pie, so after much experimenting, I've decided just to go ahead and use my pecan pie recipe!!  It's simple as can be - the most important thing is to line the pan with foil, or you'll never get them out of the pan.  I also think it's important to use a shortbread base that doesn't have brown sugar in it because if you don't have some contrast between the filling and the crust, the bars taste too sweet and a bit boring.  

Shortbread Crust
2 cups (260 grams) all-purpose flour, measured by fluffing, scooping and levelling
¾ cup sugar
⅛ teaspoon salt
16 tablespoons cold unsalted butter, cut 1' thick


Filling
3 large eggs
1 cup sugar
1 cup dark corn syrup
1 teaspoon vanilla extract
2 cups diced pecan pieces

Preheat the oven to 375 degrees F., with rack in the middle of the oven. Line a 13 x 9-inch pan completely with a double-layer of aluminum foil. Leave a good amount of overhang, so you'll be able to remove the whole thing after the bars are baked.


For the crust: Place the flour, sugar and salt into a processor and pulse to combine.  Add butter and pulse-process to coarse crumbs.

Sprinkle the crumbs into the lined pan, and then press them down to cover the whole bottom of the pan.  ( I use my flat fingers to press everything down.  Your fingers will also let you know if any part is thicker than another).  It may seem that you have too much crust, but it won't be that thick once you get it tamped down really well, and you need a fairly thick otherwise the gooeyness will seep through.


Bake the dough until just starting to brown, about 15-20 minutes.

Meanwhile, make the filling:
In a large bowl, lightly whisk the eggs. Whisk in the sugar. Stir in the corn syrup, vanilla and nuts. Pour the filling over the hot, baked crust.

Bake for 5 minutes. Lower the oven temperature to 325 degrees F.  Bake for another 25-30 minutes, until the filling is just barely set (doesn't shake).  Cover the pan with foil after 20 minutes if the nuts are getting too brown.  


Set the pan on a cooling rack and cool completely. Refrigerate the bars for at least an hour, or longer.  Cold bars will be much easier to cut.   Lift the foil up to remove the dessert from the pan. You'll be able to remove the foil completely, as the dessert will be quite stiff.

Set on a cutting board.  Cut off 1/4-inch  from the edges all around, and then cut the dessert into bars the size of your choosing.  They are very rich, so keep that in mind when cutting them.

You can serve the bars cold, or at room temperature.  Cold they are on the chewy side, and warmer they are more oozy.


domingo, 18 de diciembre de 2011

The San Francisco Street Food Festival 2011

SF Street Food Festival
There are so many reasons to go to the San Francisco Street Food Festival it's hard to know where to start. First and foremost, for just a few dollars (nothing is over $8) you can eat things you love like chicken wings, cheeseburgers and ice cream to things you may not have tried before like chicken mole croissants or wax moth larvae tacos(!) The festival takes place in the Mission district along Folsom Street between 22nd and 26th. It begins at 11 am and goes until 7 pm. It's also a fundraiser for the presenter, La Cocina.

La Cocina is a non-profit incubator that has helped many successful local food businesses get up and running and the festival showcases many of the entrepreneurs in their program. Some of their graduates include Clairesquares maker of the highly addictive milk chocolate crunchy oat flapjacks, Azalina's luscious Malaysian food an Off The Grid stalwart (and featured in Bon Appetit not long ago), and Kika's Treats. Cristina aka Kika is currently offering a gooey Brazilian cheese (gluten free) bread you must try. Other clients include Donna of Love & Hummus. Her organic hummus is silky smooth and comes in unique flavors including my favorite, roasted lemon and thyme. More favorites? Anda Piroshki and El Huarache Loco who makes the antojitos or Mexican snacks that Alemany farmer's market shoppers adore (count me among their fans).

You will also find some famous local and not-so-local restaurants at the festival too. Been dying to try the food at Flour + Water, Commonwealth, Wise Sons Deli? They will all be there. Last year I fell hard for the chicken wings from Nombe, the succulent cheeseburger from 4505 Meats and the matcha gobs from Gobba Gobba Hey. I have no idea what will win me over this year but I can tell you I am planning on trying the banh mi taco from the Peached Tortilla from Austin TX, La Victoria Bakery pan dulce (you may have read that Luis Villavelaquez has revamped the recipes), Beijing's lamb skewers and the sweet potato pie waffle with bourbon caramel sauce from Pinx. Plan ahead by perusing the full list of vendors.

Last but not least, the festival could just as easily be called the International Street Food Festival. There will be food from all over the world with vendors who are originally from places like Japan, Russia, Malaysia, Mexico and Africa. If you still need encouragement, check out the slide show to see just a few of the smiling faces and to get a preview of the ridiculously delicious food. See you there?
Get the flash player here: http://www.adobe.com/flashplayer


More previews?

SFoodie
SFBG
Eater SF
Bay Area Bites (for vegetarian only picks)

domingo, 11 de diciembre de 2011

Passover Time


While I wasn't planning on posting this recipe just yet, I realized that some of you might need to order ingredients for Passover, and it might be a good idea to just give you an idea of what you should order.
This is a fairly easy chocolate cherry cake.  If you think you  might like to make it, here are some of the ingredients you might want to order:


chopped pecans (you need 1 cup, or more if you want to pat some around the cake sides
matzo cake meal (you need 1/4 cup)
semisweet chocolate, chopped  or chips (24 ounces)
sugar (1 cup)
non-dairy Topping (such as Unger's Whip or Haddar)
powdered sugar (5 tablespoons)
cherry preserves (2 jars 778 brand)

I was really excited to see what's available for Passover this year online:

http://www.choclat.com/ has lots of Passover chocolates - both for baking and for eating.  You need to order by April 11th

http://www.ohnuts.com/ has all kinds of nuts, including cashews, pistachios, filberts, pecans, etc.  They also have chocolate chips, cocoa, coconut, any kind of dried fruit, sundried tomatoes, etc.

http://www.aviglatt.com/  has brown sugar

http://www.allinkosher.com/ has cashew butter and both Haddar and Ungers nondairy topping liquid (frozen). 

Take advantage of all of these great products that you can get online these days and make something different!!

I'll be posting my recipe in the next two weeks, and I'll also have an easy but elegant cookie posted at wwwkoshereye.com (probably mid-Passover week).  Almond Ganache Sandwiches are pareve and are made without any special ingredients that you would have to order - perfect for mid-week entertaining, lunch boxes and family dessert.  You might also find my Passover Macaroon recipe there.  It's a great site, so take a look!

Chewy Almond and Ganache Sandwiches

miércoles, 30 de noviembre de 2011

Becca's Baby Shower Bear Cake


After making marshmallow fondant for my last baby shower event, I was excited to try covering a cake with fondant.  I had been hesitant before, because commercial fondant doesn't taste very good, but marshmallow fondant tastes pretty good and doesn't have a lot of artificial ingredients in it.  The second drawback came when I saw that fondant shouldn't be refrigerated.  That doesn't work for me, because I usually use buttercream made with egg whites and butter.  I decided to use Marshmallow Fluff instead of egg whites, but I wouldn't sacrifice the butter.  Somewhere along the road, I read that if the cake were kept at 45 degrees, the fondant would be okay.  Since I have a second refrigerator, it was easy to make that adjustment, and as you can see from the picture, the fondant came out beautifully.  The lettering is done with Wilton Sugar Sheets, and I didn't know how they would do refrigerated either, but they seemed to be fine as well.

I made the bear a week in advance to give it time to firm up so that I could easily move it to the cake.  It took an entire recipe of marshmallow fondant, and I added the green while the marshmallows were melted. This way I didn't have the arduous and messy task of kneading in the green.  (I needed some black and pink fondant, which came from the white batch that I made to cover the cake). Work on a piece of waxed paper, so that you can move the bear after it has been made.

Start with the legs.  They need to be fatter at the top (the hip/thigh part) and taper to the foot.  Just bend the bottom of this piece to make the foot, which you can perfect after the bear is assembled.

The legs are going to attached midway, or slightly farther back from the center of the body.


Once the legs are made, the body can be shaped.  It needs to be pear-shaped so that it comes down between the legs.  Make the body taller and thinner than it needs to be.  The head is going to weigh it down so that the finished bear will be shorter and fatter than you started. Attach the legs with a little water.


The arms get fashioned in the same manner as the legs with the top shoulder/bicep fatter than the hand.  If you have the arms too long, you can always pinch off some to get them right once you have the bear all assembled.

For the head, start with a round ball about 1/3 the size of the body.  Put a toothpick or stick of spaghetti into the body and then stick the round ball on.  Once you have the ball stuck onto the body, you'll be able to see if it is proportioned right.  If it isn't right, you get something that looks more like a pig, so just keep playing with it until it looks right.  The snout, nose and eyes, though will really start making it look like a bear.


Some directions for teddy bears have the snout be flat and oval, but mine just didn't look bearlike until I made the snout stick out and be more triangular.  Once you have it the shape you like, attach it with water.


Color a small bit of fondant with either dark brown or black coloring.  Make the nose a reverse triangle from the snout.  My bear has a substantial nose!  I think it could be smaller and still be very bearish.  The eyes, on the other hand, need to be pretty small to be right, and to me they seem to look best if they are touching the snout rather than farther up on the head.  The mouth is easiest made with an edible marker.

For the ears I flattened a very small ball of green fondant, and then made them slightly concave.  I used a fondant ball tool to make the indentation for the pink fondant.

To add the final touches. put on the pink foot pad with a small brown pad at the bottom.  For the toes use the edible marker.  The toes can either be on the pad like I did, or off the pad on the green part (these are the claws, so they can even be right at the edge of the green part of the foot).


To make the fur, use a small scissor to make tiny clips into the fondant, which will stick up and look like fur.  Lastly, score the head/snout area so that it looks like the head has been stitched.  I used a flat toothpick, but there is a fondant tool for this purpose, if you have one.

Slide the waxed paper and bear onto a cardboard round and set aside to dry for 5-7 days at least. Once the bear has dried out, you'll be able to lift him off of the paper and onto the blanket, or wherever else you like.

For the blocks:
The blocks came from a Wilton design, which you can find at http://www.wilton.com/idea/Baby-Block-Cake.  For the round cake, I had to proportion the blocks smaller, but you'll  have to adjust them to the size cake you make (mine was 12-inches).   To see if the proportions would work, I cut the blocks out of paper and laid them on an upside down cake pan.  Once I had the right size block, I printed out letters on my computer, testing out different fonts and sizes to get the one I liked best, and the size that looked good on the block size I had chosen.  After you do that, you can use the Wilton instructions for cutting out the Sugar Sheets and applying the sanding sugar.  A word of caution - you can't pipe and sprinkle all of the blocks with the sanding sugar, and then hope to transfer them to the cake.  If any of the piping gel has gone onto the back or off the sides of the block, the blocks will adhere to the surface you have them on.  Instead, cut out all of the blocks, attach the letters and only  apply the edge gel and sugar just before placing them on the cake.  To get the spacing nice, I put my little paper mockups on the cake, and then replaced each one with the Sugar Sheet block.  That way it was easy to see which block went where.

Making the blanket:


I used the blanket to hide the little cardboard round that the bear was on.  I was afraid that the bear might sink into the cake, so I put 3 straws into the cake (cut even to the top of the cake) to support him, and then the bear was on a 3-inch round cardboard that I found at Michael's Craft Store.


To get the correct size, I just kept adding strips to the blanket until it covered the cardboard.


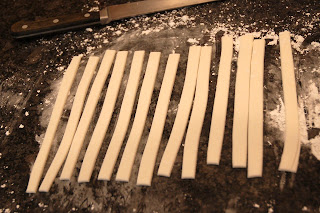
To begin making the blanket, sprinkle a work surface with powdered sugar and roll a piece of fondant to  just thicker than 1/16-inch.  Cut out strips, about 1/8-inch wide.


Lay the strips horizontally, and  weave 1 strip through the others so that one horizontal is on top and one on bottom, alternating until the whole strip has been woven.


Fold back the strips that are underneath the vertical strip.


Place on another vertical strip, close to the first one.


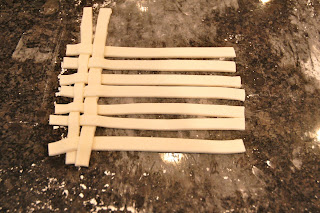
Fold down the strips that were up, so you now have two strips that are woven.  Fold up the strips that are underneath, and repeat the whole process.  Move the strips close to each other after they are woven in.


When the blanket is the size you want, press down on it to mesh it all together nicely.

Cut the tails to an even length.  To make the fringe, make small cuts into the tails with a knife.  Slide the blanket onto a small round or square cardboard so that you can move it, and so that it provides a nice base for whatever will go on top of it.

For the cake I used the chocolate cake recipe from my wedding cake (http://amazingdessertrecipes.blogspot.com/2009/06/tales-of-tiered-cake-final-recipes.html) . I used a nail rose in the center of each to make sure that the cake cooked evenly in the middle (don't forget to remove it when you flip the cake out of the pan!).  It worked beautifully.  A center cone would also work, but then you have to put in a plug, so I prefer the nail method.  The frosting was an easy marshmallow meringue buttercream- see http://amazingdessertrecipes.blogspot.com/2010/02/valentines-day-layer-cake.html.  Leave out the cassis and use the powdered sugar and corn syrup sparingly, to taste.  Don't forget that you'll have the sweet fondant on the outside, so you don't want the frosting too sweet.  Some people won't eat the fondant, though, so it should be sweet enough.  You'll need a double recipe (3 pounds Marshmallow Fluff).


martes, 29 de noviembre de 2011

http://feedproxy.google.com/~r/blogspot/sBff/~3/llShd_jcQo4/crazy-basil-peach-black-pepper.html

This unusual basil, peach, black pepper, Parmesan cobbler recipe started out as an innocent experiment making individual-sized cobblers, but somehow spun out of control into weird and wonderful new directions.

I was thinking about a cheese Danish, so I grated some Parmigiano-Reggiano into the batter. I was thinking about Gougères, so I added some freshly ground black pepper as well. I was thinking about a peach and basil sorbet I had one time, and decided that some of the sweet aromatic herb seemed perfectly appropriate.

The result was one of the more interesting and delicious desserts I've eaten in a long time. The flavors are subtle, but identifiable. I love, love, loved it. It may sound a little savory, but it was plenty sweet enough, and would make a memorable end to any late summer meal. I hope you give it a try soon. Enjoy!

Note Regarding Self-Rising Flour: As we said in the regular peach cobbler post, it is recommended you go out and get some self-rising flour. You can make it yourself, by adding baking powder and salt to all-purpose flour, but for whatever reason, it just doesn't seem work as well.


Ingredients:
Two 10-oz ramekins with 2 tsp melted butter in each
For the batter:
1/2 cup sugar
2/3 cup self-rising flour
2/3 cup milk
1 tbsp finely grated Parmigiano-Reggiano
pinch of black pepper
For the peaches:
1 large peach, peeled, pitted, sliced into 10-12 slices
2 tbsp sugar
2-3 torn or sliced basil leaves
1/2 tsp balsamic vinegar
1 tsp water

http://feedproxy.google.com/~r/blogspot/sBff/~3/QzjQsC6Ro1Y/next-up-spicy-cornell-enductaed.html